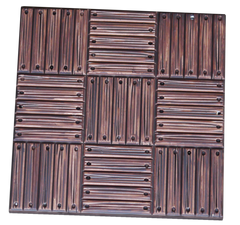
Painting Guide: Wooden terrain in one coat with The Army Painter Speed Paints!
Posted by Annabelle Collins on

Hullo all!
Not all of us have the hours to spend intricately painting terrain so here's a guide for how to make great looking wooden terrain in next to no time at all!
This tutorial is rated easy-peasy. It takes not time and practically no skill - perfect for a lot of us trying their hand at painting for the first time!

Materials Needed:
- Modular Realms magnetic dungeon tiles, "Wood" texture - you can get them here!
- White Primer - I used this one
- The Army Painter Satchel Brown Speedpaint
- Paint brush
- Matt varnish - I used this one
I want to take a moment to thank The Army Painter for sponsoring me. They sent me the Speedpaints I experimented with in order to bring you this terrain painting guide.
I've used their paints across the years and genuinely love their products. It's a pleasure to be sponsored by them now! Cheers guys! :D
Step 1
Prime your gaming terrain white
When using The Army Painter speed paints I like to prime my terrain white. It makes the colours pop more.
O k, I know the picture looks kind of grey, but it looks white in real life!
I've found that different primers work better than others with speedpaints.
Experiment with caution - speed paints do not work well over primers that give a rough or chalky surface texture!
Today I used Plastikote Matt White.
Step 2
Paint a layer of brown Speedpaint over the terrain.
I like to use a biggish flat brush, painting in the direction of wood grain for each square. That means I can paint a whole bunch of terrain in very little time ^ ^

If you don't have a flat brush then a normal one will do, just paint a plank at a time instead, again, following the grain of the wood.

If you dilute the Speedpaint ...
You can also choose whether you want to use your Speedpaint at the thickness it comes in, or whether you want to dilute it a bit.
Personally, I prefer diluting it slightly. Not too much (we don't want it thin!), but just enough to lighten the effect. 1 drop of water to 3 drops of Speedpaint is about right.

With the lighter effect, I then like to come back and pick out individual planks with another layer of Speedpaint.
It doesn't take long but I really like the effect.
It makes the wood seem more realistic to me.
Step 3
Varnish the terrain

Yup, we're pretty much done! Just let your dungeon tiles dry off and it's time for a varnish.
You can go straight for a spray of matt varnish if you want to be quick.
If you're clumsy like me and know your terrain are going to be knocked about a bit then I recommend giving them a layer of gloss varnish and then a layer of matt. Up to you!
And Bob's your badger!
I love using the speedpaints on wooden terrain. It's a lot quicker to do in one go compared to the dark wash wash-drybrush method and a £5 bottle of speedpaint should do a whole set quite happily! It actually ends up being pretty cost effective.
My bottle has done two adventurer packs and several practice tiles so far and I'd say there's still 20-30% left.

So there we have it, easy, quick *and* affordable (now how often do we see those three together?).
This is definitely a technique for painting the wooden terrain that I would recommend to almost anyone, regardless of skill level.
Thanks for coming to todays Ted Talk ;) Hope it was helpful! :D
